Simple React Native StackNavigator Tutorial – navigating between screens
Mobile applications often use more than one screen to properly present data. How can we create more than one screen? That’s what StackNavigator is for.
To use navigation between screens, you must install a library called react-navigation in your project folder. You can do it by entering the following commands:
Next, we create a folder called components. In this folder we create StackNavigator.js component, in which we import the createStackNavigator function – to create our navigator, and the createAppContainer function – to close the navigator in the component that we can export. We will also create components called Screen1.js, Screen2.js, Screen3.js which we import into StackNavigator.
StackNavigator.js
import React, {Component, PureComponent} from 'react';
import { createStackNavigator, createAppContainer } from "react-navigation";
import Screen1 from './Screen1';
import Screen2 from './Screen2';
import Screen3 from './Screen3';
Now we create a variable called MyStackNavigator, which will be our navigator. Inside the navigator we add three screens – the main screen: Screen1, and two side screens: Screen2 and Screen3.
InitialRouteName – this is screen, which will be load as default. Below we set several options for the header: height, background color, shade of elements in the header, color and font weight.
Finally, we create a component from StackNavigator so that we can connect it to our application:
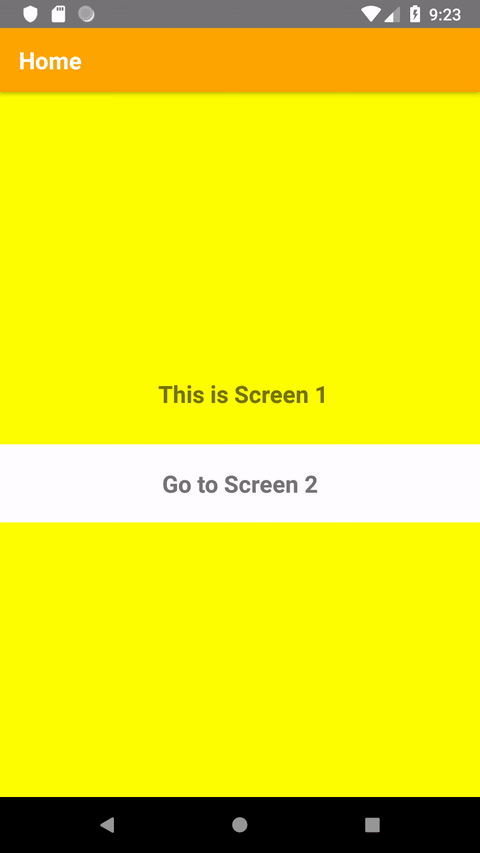
Now we complete the Screen1 component to display data on the screen. We will put a button in it, that will redirect to the next screen and add appropriate styles
Screen1.js:
import React, {Component} from 'react'; import {StyleSheet, Text, View, TouchableHighlight } from 'react-native';
In navigationOptions we set the screen title that will be displayed in the header. In the component, we return a button in the form of TouchableHighlight, which can be styled accordingly. After pressing the button, the navigation will direct us to screen number 2. This code is responsible for this onPress={() => this.props.navigation.navigate('Screen2')}
Next screens looks like this:
Screen2.js:
import React, {Component} from 'react'; import {StyleSheet, Text, View, TouchableHighlight } from 'react-native';
render() { return ( <View style={styles.container}> <Text style={styles.text}> This is Screen 3</Text> <TouchableHighlight onPress={() => this.props.navigation.popToTop()} style={styles.touchableHighlight} underlayColor={'#f1f1f1'}> <Text style={styles.text}>Go to Screen 1</Text> </TouchableHighlight> <TouchableHighlight onPress={() => this.props.navigation.goBack()} style={styles.touchableHighlight} underlayColor={'#f1f1f1'}> <Text style={styles.text}>Go back to Screen 2</Text> </TouchableHighlight> </View> ) } }
Screens 2 and 3 contains two buttons, one to the next (or first) screen and the other to the previous one. By setting the underlayColor property we can change the color of the button after touching it.
<br>
Whole code looks like this:
Wszystko działa jak należy, ale możemy jeszcze poprawić efekt przewijania. W zmiennej MyStackNavigator dodamy właściwość transitionConfig, która sprawi, że nasz ekran będzie się wysuwał z prawej strony:
Everything works fine, but we can still improve the scrolling effect. In the MyStackNavigator variable we add the transitionConfig property, which makes our screen slide out from the right:
I write code that (usually) works. I tame WordPress, learn React, explore the world of DevOps, and click around in the Linux console. I optimize code as a hobby, because laziness is the purest form of productivity. I do my best not to lose my mind somewhere between a bug and a deadline.